Creating quantity receipts
In order for an invoice to be paid for items or services purchased through SmartBuyPlus, a quantity or cost receipt must be created. The difference between the two is explained below:
- Quantity Receipt – Generally appropriate when the Purchase Order was used to purchase physical items such office supplies, equipment, etc.
- Cost Receipt – Used when the basis of the Purchase Order is a dollar amount. Examples include not-to-exceed POs for local food vendors (the PO is based on a dollar amount); POs for services such as consulting, performing, etc.; airfare; POs that will be paid using multiple payments.
Instructions for completing receipts:
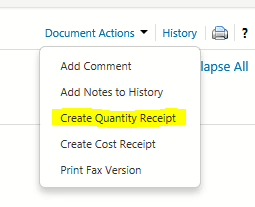
From the list of search results, click on the PO number This will open up a screen displaying the Purchase Order information. Select “Create Quantity Receipt” (or “Create Cost Receipt”) from the dropdown menu at under “Document Actions” at the upper right hand side of the screen.
Find the purchase order (PO) you are receiving. You can look up recent POs from the drop-down menu beside your user name in the upper right-hand corner of the home page, select ‘My Recently Completed Purchase Orders’ or you can search by the PO number by clicking on the magnifying glass icon in the upper right hand corner of the screen.
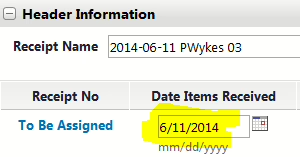
The receipt page is divided up into two sections. The top is “Header Information” and the bottom is “Receipt Lines.” You can ignore most of the “Header Information,” however you must enter the correct date that you actually received the items(s) in the “Date Items Received” field when creating receipts at the end or beginning of a fiscal year.
Quantity receipts
The “Line Details” section is where you indicate what items have been received. When creating a new receipt, the “Quantity” fields for each item will automatically default to the amounts from the PO (or the amounts you haven’t yet received if you’ve already partially received the order).
Receiving scenarios:
Complete Order Received – Just enter the receipt date (see above) and then hit the “Complete” button in the lower right hand corner of the screen. All the other values will have been defaulted to the correct amounts.
Partial Order Received – Edit the “Quantity” field for each line that was only partially received. If no quantities of a line were received, click the “Remove Line” button under the “Actions” column. Click the “Complete” button on the bottom right hand of the screen. When the remaining items are received, create an additional cost receipt following the instructions above.
Returning Items – Items that you are returning need to be both “received” and “returned,” which is accomplished by clicking on the “Receive and Return” button under the Actions column for the item(s) you are returning. When you click on the button, it will create another line for the item so you will have one line showing the number you received and another line showing the quantity you are returning. Enter the appropriate quantities in each line and then click the “Complete” button on the bottom right hand of the screen. Please note – if you are permanently returning the items (for example, you are not expecting damaged items to be replaced) you should also complete a “Change Order” form to request that the PO be modified to reflect the new, lower, quantity – this will release the encumbered amount in Banner.
Cost receipts
In the “Line Details” section at the bottom of the screen, you should see the line(s) from the related purchase order along with the dollar amount associated with the line in the “cost” column. If the cost you are receiving is different than the cost showing in the receipt, change to the cost amount to equal the cost you want to receive. Click the blue “Complete” button when you are finished.
You may also view a brief video tutorial on this topic.
Also see revising and deleting receipts.
Editing or deleting receipts
You can revise or delete receipts up until the point where an invoice has been processed against the order (because invoice payment is tied to receipt status). If you make a mistake with a receipt that you don’t know how to fix, it’s often easier to delete the receipts and then create new ones.
To revise/delete receipts:
- Open the purchase order than the receipt was created for.
- Click on the “Receipts” tab.
- You will see a list of all the receipts that you have created for the PO.
- Click on the receipt number for the receipt you wish to edit/delete.
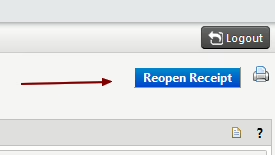
- Click on the “Reopen Receipt” button located at the upper right hand side of the screen (see below). Please note that if an invoice has been posted against the PO this button will not appear.
- Provide a reason why the receipt is being opened in the dialog box that appears on the screen and then click the “Reopen Receipt” button at the bottom of the dialog box.
- You will now be able to edit the receipt. Make the necessary changes and then click the blue “Complete” button at the bottom right hand of the page.
- If you wish to delete the receipt and start again, click the blue “Delete” button at the bottom of the page.