
Adding attachments to orders
Sending notes and attachments to vendors
When creating Non-Catalog Purchase Orders (POs), there may be times when you need to send notes and/or attachments to vendors. The most common example is when you are placing an order and the vendor has provided you with a quote and you want to have that quote accompany the PO. To add external notes and/or attachments, do so within the requisition in the appropriately marked fields.
- Please note that any attachments should be in an easily readable file format such as .pdf, .doc, .txt, .jpg. Please do not attach Outlook message files (.msg). If you need to attach an email message, please print it to a PDF file first.
Creating manual purchase orders
Please Note: Do not use this method for ordering from local food vendors. Please see Local Food Vendor Purchase Order instead.
There are rare occasions when you will not want a purchase order (PO) to be faxed or emailed to the vendor. For example, you may be hand-delivering the PO to the vendor. By default, all non-catalog POs generated by SmartBuy Plus will be sent via fax or email (catalog orders are integrated with the vendor’s ordering system). To prevent SmartBuy Plus from electronically delivering POs, complete the following steps:
- If you are a shopper using the “Express Checkout” view, you need to switch to “Advanced Checkout” by clicking on the “Go To Advanced Checkout” link at the bottom of the page.
- Click on either the “General” or “Final Review” sections of the arrow shaped bar at the top of the screen.
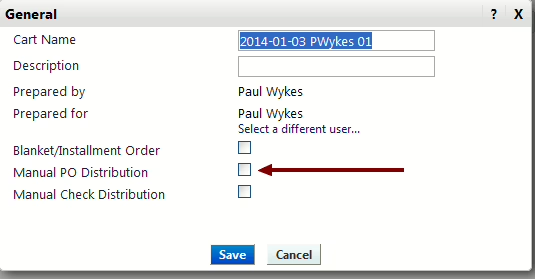
- In the “General” section (see image below), click the “edit” button to the right of the “Cart Name.”

- You will now see another window (see below). Click the checkbox to the right of “Manual PO Distribution.”
- Proceed to the rest of the checkout steps(or assign cart steps if you are a shopper).
Once the requisition has completed the approval process and turned into a PO, you can print the PO as follows:
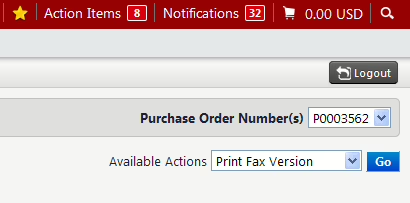
- Find the PO you are looking for. There are several ways to do this but the easiest is generally to click on your name at the top of the main SmartBuy Plus screen and then choose “My Recently Completed Purchase Orders” from the list of options. You will then see a list of Purchase Orders you have created within the last 90 days. Click on the PO number to view the PO.
- From the available actions menu (see below) that appears in the upper right of the screen, select “Print Fax Version” and click “Go” button next to the menu.
Punchout catalogs
Most catalog shopping in SmartBuy Plus is done using Punchout Catalogs, which are are integrated with the vendor’s own web-based catalog/shopping system. When shopping from a Punchout Catalog, the user is sent to the vendor’s website to add the desired items to their shopping cart. When the user has finished shopping, their shopping cart is then brought back into SmartBuy Plus to complete the ordering process.
Instructions for using punchout catalogs:
- From the SmartBuy Plus home page you can view the available catalogs.
- Select which vendor’s catalog you want to visit by clicking anywhere on the rectangle where the vendor’s name and/or logo is displayed.
- The vendor’s online catalog will be displayed in a separate browser window. If a new browser window does not open, make sure your browser is set to allow pop-up windows from the site.
- Add items to your shopping cart. As with any online shopping experience, each vendor will have their own way of doing things. In general, the process is to search or browse for the item you are looking for. Once you find the item, you indicate the quantity you want to purchase and then add it to your shopping cart.
- Once you have added all the items you want to your cart, follow the vendor’s instructions for proceeding to checkout (again, each vendor may do this differently).
- Your shopping cart will be brought back into SmartBuy Plus’s “Cart” for you to complete the order.
- Depending on the vendor’s set-up, you may be able to make adjustments to your order, such as changing quantities and deleting items from within SmartBuy Plus’s shopping cart view. If you decide you no longer want an item, please delete it by clicking on the “Remove Line” button instead of changing the quantity to zero. If you set the quantity to zero, it will create an error when sending the order to Banner, resulting in delays placing your order.
Tips for using punchout catalogs:
- You can add items from multiple vendors to your SmartBuy Plus shopping cart. This can be helpful in comparing pricing. For example, you could shop for pens in the WB Mason catalog and add them to your shopping cart. You could then also go to the Staples catalog and shop for pens there and add them to your cart. In SmartBuy Plus’s “Cart” you can then view and compare the pens you selected and remove the more expensive ones (by clicking on “Remove Line”.
- If you don’t see what you are looking for in an online catalog, you can exit it by closing the browser window. You then click on the blue “Cancel Punch-out” button in SmartBuy Plus – located on the upper right-hand corner of the screen.
- You can also place orders with vendors that have Punchout Catalogs using a Purchase Order Request form if you need to order an item that is not contained in their online catalog. You will generally need to obtain a price quote from the vendor’s sales representative before you can do this. A good example is if buying furniture from WB Mason. Please contact the Director of Purchasing if you have any questions about how when or how to do this.
- Do not include any external notes or attachments for Punchout Catalog orders. Punchout Catalog orders are fulfilled by sending an electronic file to the vendor’s purchasing system, which will complete the order electronically. Any external notes or attachments will create an exception that will slow down the ordering process.
Vendor specific notes:
GovConnection can occasionally provide lower pricing if you request a quote from them, especially for costlier items or multiple quantities. To request a quote, add the desired items to your shopping cart from within the GovConnection punchout website. When viewing the GovConnection cart, you can then click on the “Request Quote” button and then exit the punchout catalog. GovConnection will then prepare a quote for the items you have added to the cart and will notify you via email once the quote is ready. You can then go back into the GovConnection website and retrieve the quote. If you want to buy the items listed in the quote, you can then add them to your cart and it will reflect the quoted pricing.
Purchase order request form
The Purchase Order Request form is the electronic equivalent of a paper purchase order (PO). It is used to create POs for items that are not available from any of the punchout or hosted catalogs. Upon completion, the PO will be faxed or emailed to the vendor or you can optionally select to print the PO if you are going to hand deliver it to the vendor.
Open the form
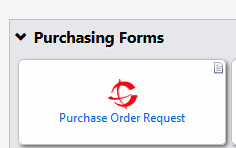
Click on “Purchase Order Request” located as the first item in the “Purchasing Forms” section of the SmartBuy Plus home page. Use this option whenever you want to create a PO for an item that is not contained in one of the hosted or punchout catalogs.
Select the vendor
In the Vendor Information section, search for the desired vendor by typing the first few letters of the vendor’s name in the box labeled “Enter Vendor”. A list of vendors containing the typed letters will appear. Select the vendor you want from the list. If the vendor’s name doesn’t appear, you can click on the “vendor search” link to search again.
Review the PO distribution method
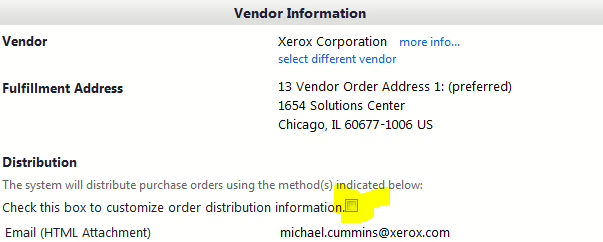
SmartBuy Plus will automatically distribute the PO to the vendor by fax or email. When the vendor is selected, SmartBuy Plus will show you which distribution method will be used – either fax or email (see example below). If the distribution method is missing, the PO will not be sent to the vendor. If this occurs, you can click the box to enter a fax number or email address that will be used for this PO only. As this is just a one time change that applies to the one PO only, you should also notify the Accounts Payable Office of the correct email address or fax number so they can add that information to the vendor’s record in Smart Buy Plus.
If you know you need to have the PO sent to a different fax number or email address, you can click the box next to the words “Check this box to customize order distribution information” and then add the fax number/email address that you want the order sent to. It is strongly recommended that you do not provide both a fax number and email address as that can result in confusion and/or duplicate orders.
If you don’t want the PO to be sent to the vendor – for example if you are going to be hand delivering it, please see the instructions for “Manually Distributing a PO.”
Add order details
Enter a product description, quantity and price estimate. You may optionally also enter the Catalog Number if you have it. You may also indicate additional instructions for the vendor which will appear on the PO.
Indicate “product flags” (optional)
In the “Product Flags” section, click on the check box next to any of the product descriptions that apply (Recycled, Hazardous Material, Green, etc.). While these categories are primarily used for reporting, it is important to check the “Hazardous Materials” box if you are ordering any chemicals, which will provide notification to the Chemical Safety Officer.
Add attachments to be sent to the vendor (optional)
To save the form, select “Add and go to Cart” from the “Available Actions” drop-down list located at the top right hand corner of the form (see below) and click on the blue “Go” button.
If you have more items to add to the order, select “Add to Cart and Return” from the “Available Actions” menu and click on “Go”. A new form will be displayed but it will remember the vendor information – you just need to add the additional order information. You can repeat this step as many times as necessary. When done, select “Add and go to Cart” from the “Available Actions” list.

Proceed to checkout
You can now either view your cart or go to checkout by clicking on the shopping cart icon on the upper right-hand corner of the screen. You may now continue through the checkout process or assign the shopping cart (depending on your user role).
Submitting shopping carts on behalf of other employees
The approval process in SmartBuy Plus is handled on a per-user basis. For transactions over the user’s approval limits, and all employee reimbursements, the transaction will be automatically routed to the user’s Financial Approver (generally their supervisor). If you are therefore submitting a reimbursement request, or other transaction, on behalf of another employee, SmartBuy Plus needs to know that so the approval request will be sent to the right person. Fortunately, this is an easy step to accomplish by following the instructions below. For purposes of these instructions, we’re going to assume you are creating a Travel Reimbursement on behalf of another employee.
- The first step is to complete the Travel Expense Reimbursement form and add it you your cart (see the form itself for detailed instructions).
- Once the form is in your shopping cart, proceed to checkout.
- If you are a shopper using the “Express Checkout” view, you need to switch to “Advanced Checkout” by clicking on the “Go To Advanced Checkout” link at the bottom of the page.
- Please complete the steps below before you add any accounting codes since the codes you enter will be replaced during the steps below.
- Click on either the “General” or “Final Review” sections of the arrow shaped bar at the top of the screen.
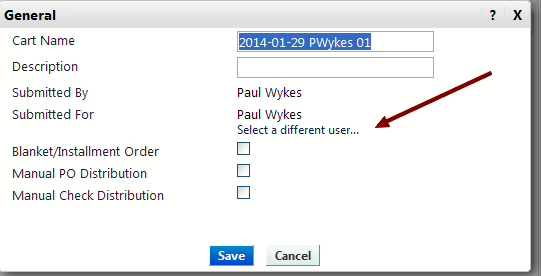
- In the “General” section (see image below), you will see that it shows “Submitted By” and “Submitted For”. When you create a Travel Reimbursement form for another employee, you are preparing it for them so you need to changed the “Submitted For” value. You do that by clicking the “edit” button to the right of the “Cart Name.”

- You will now see another window (see below). Click where is says “Select a different user…” and a “User Search” window will appear. Search for the employee using any one of the fields – you don’t need to complete them all.
- Select the user from the list of search results by click on the “[select]” link in the “Action” column on the right of the window.
- When the employee has been selected, their default information will now be loaded into SmartBuy Plus. Please note that if the user has not configured a default “Ship To Address”, you may need to complete the “Ship To” address section.
- If you need the item shipped to a different address, you may change it.
- You should now proceed to add the accounting codes and then proceed to either “Submit Requistion” or “Assign Cart” depending on your user role.
Types of SmartBuy Plus catalogs
One of the main features of SmartBuy Plus is the ability to shop from online catalogs. There are several benefits from using the online catalogs:
- You can shop from the catalogs without needing a separate log-in/account to the vendor’s online store.
- The catalog vendors have been pre-selected as vendors that provide discounted pricing to Clark. Shoppers can use these catalogs knowing that they are getting preferred pricing and do not need to spend additional time shopping around for the best deals.
- The pricing in the online catalogs reflects discounts offered to Clark.
- Ordering from the catalogs is generally quick and easy – it saves time compared to ordering outside the catalogs using a non-catalog PO.
Catalog types
There are two types of catalogs:
Punchout catalogs
Most of the SmartBuy Plus catalogs fall into this category. Punchout Catalogs are integrated with the vendor’s own web-based catalog/shopping system. When shopping from a Punchout Catalog, the user is sent to the vendor’s website to add the desired items to their shopping cart. When the user has finished shopping, their shopping cart is then brought back into SmartBuy Plus to complete the ordering process.
Benefits:
- Links to vendor’s current catalog so all pricing and catalog items are current.
- Vendor’s catalogs generally reflect product availability – will let you know if it’s in stock.
Limitations:
- You can only search for products within the vendor’s own website. There is not currently a process to allow searching multiple punchout catalogs for the best pricing.
- You cannot quickly re-order items from punchout-catalogs. You must go back into the catalog and find the item again to re-order it.
Hosted catalog
A Hosted Catalog is similar to an online version of a vendor’s printed catalog. Hosted catalogs contain product data and details, along with pricing information for each item. When a product search is performed, the products in all of the hosted catalogs are searched. Shopping from Hosted Catalogs occurs within SmartBuy Plus. Vendors provide periodic updates to the catalogs by uploading data. There are currently only a handful of hosted catalogs available.
View requisition status
How to find out where a requisition is in the approval process
There are several ways to view a user’s order history:
- Select the shopping cart icon from the vertical toolbar on the left side of the home page and choose ‘My Carts and Orders.’
- Select from the options under the drop down menu that appears when you click on the user icon in the upper right hand corner of the home page.
- Perform a search by selecting the type of search from the “All” drop down list on the vertical toolbar.
- If you search for a requisition or purchase order and want to review all the steps in it’s history, you may do so by clicking on the “History” tab.