Assigning Accounting Codes
Before any order can be placed in SmartBuy Plus, accounting codes must be assigned to the order. Both shoppers and requestors (see SmartBuy Plus User Roles) can assign accounting codes, however the requestor must have the authority in Banner to charge the accounting codes or else the order will be returned. Shoppers are not required to add accounting codes – they can assign their carts without any accounting codes attached. Multiple accounting codes can be assigned to an order, provided the requestor has the authority to charge all the accounting codes in the order (see below).
Accounting codes are added as a part of the Checkout process. It is generally very helpful to set up default accounting codes for both Fund and Organization (ORG). For instructions on how to set up accounting code defaults, please see the “How to Set Up Defaults and Code Favorites” page. It is strongly recommended that you do not set a default for the “Account” code as this will usually change depending on the nature of the order being placed and it could lead to errors if you forget to change the default setting.
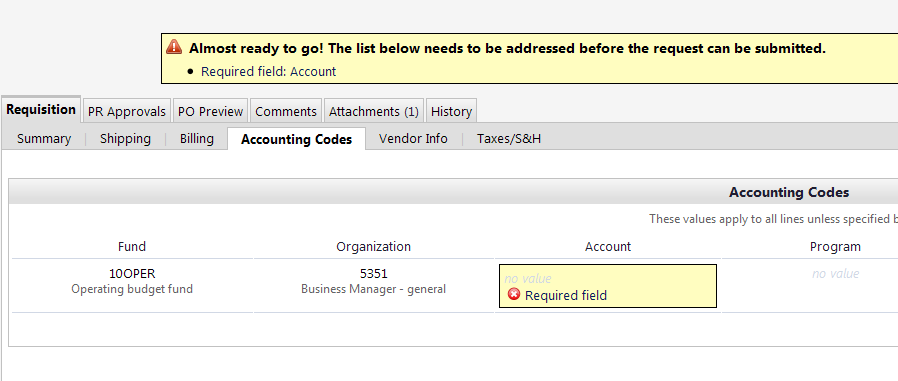
Assuming you have set the Fund and ORG defaults, when you proceed to checkout, you should see a screen similar to the one below. At this point, you can click on the “Required field” link under the Account field to bring up the accounting code entry form.
On the Accounting Codes entry form, you have several options for adding the codes:
- If you know the code you are charging, you can type in the value in the appropriate entry box.
- You can click on the “Select from profile values” link to see a list of accounts you have saved in your profile.
- You can click on “Select from all values” to select from any of the account codes. When you select this option, you will be presented with a “Custom Field Search” form with field for Value and Description. If you know the value of the field you can type it in and click search to verify you have the correct one. You can also enter the first character of the account and then click search – for example, typing “2” in the value field and then clicking search will give you a list of all accounts beginning with “2”. If you search by description, you can also use the “*” character as a wild card – for example, typing “*chem*” and then clicking “Search” will result in a list of all chemistry related funds/orgs/account.
- You can also select from a list of “Code Favorites” by clicking on the drop-down box next to the words “Select from your code favorites”. Code favorites are a great way of setting up lists of fund/org/account combinations that can be quickly retrieved. Please see the section on setting up account code defaults for instructions on creating code favorites.
- Please note – Fund, Organization and Account codes are required for all transactions. Program, Activity and Location should only be completed if you are instructed to do so by the accounting office. Please see Understanding Accounting Codes for more information.
Splitting Account Codes
Orders in SmartBuy Plus can be split among multiple account codes, provided the requestor has the appropriate authority in Banner to charge all of the accounts. There are two different methods for splitting account codes and it’s important to understand the difference:
- Splitting at the Header Level – When splitting at the “header level”, the account code split applies to all of the items in the order. For example, if you have three different items in your order and you apply a 50/50 split in the header level, the split will apply to each of the line items.
- Splitting at the Line Level – with line level splitting, you assign one or more accounts to each individual item in the order. This is generally the preferred way to split accounts if your order contains more than one item.
- Combination – You can assign accounting codes at both the header and the line item levels. This makes sense if you have several items to be charged to one account and then only one or two to be charged to a different account. You can assign the primary account number in the header and then assign a different account for the lines that are an exception.
The method you choose will depend on the type of order you are placing. Here are a couple of examples:
- You are placing an order that includes pens ($10), paper ($20), and cleaning supplies ($30) and you want to charge the cleaning supplies to Operating Supplies (7385) and the other items to Office Supplies (7380). If you do this at the header level, SmartBuy Plus and Banner will ultimately determine the percentage you have assigned to each account and apply that percentage to each line item. In this example, 50% of the total order is being assigned to Office Supplies and 50% to Operating Supplies so SmartBuy Plus/Banner will assign 50% of the cost of the pens and 50% of the cost of the paper to Cleaning Supplies (along with 50% of the cost of the cleaning supplies). The better way to handle this type of order is to assign separate accounts for each line item. That way, Banner and SmartBuy Plus will assign the full cost of the pens and paper to Office Supplies and the full cost of the cleaning supplies to the Cleaning Supplies account.
- You are placing an order that includes pens ($10) and paper ($20) and need to split the cost between two different grants. In the case, it’s easier, and more appropriate, to do the split at the header level since you are splitting the cost of each item equally between the grants.
- You are ordering eight different products. Six of them need to be charged to account 7380 and two of them need to be charged to account 7385. Instead of assigning account numbers to all eight line items separately, you can add account number 7380 to the header level and then assign account 7385 at the line level for the two items that need it.
To assign account codes at the header level, you enter the accounting codes in the “Accounting Codes” area, located at the top of “Accounting Codes” section of the “Requisition Tab” (see image above). You will note that it states “These values apply to all lines unless specified by line item”.
To assign account codes at the line item level, click the “Edit” button that appears underneath the extended price for each line item (this is also in the “Accounting Codes” section of the “Requisition Tab”).
When assigning accounting codes using either method, you can create a split by clicking on the “Add split” link to the right of the accounting code entry form. When splitting accounts, you have the choice between “% of Price”, “% of Quantity”, “Amount of Price”, or “Amount of Quantity”. If you need more than two splits, you can keep clicking the “Add Split” link.
Purchasing Office
Purchasing Director
Clark University
950 Main Street
Worcester, MA 01610
1-508-421-3839
Monday – Friday
8:30 a.m. to 5 p.m.