General
What are the benefits of SmartBuy Plus?
The introduction of SmartBuy Plus will provide several benefits to the Clark community including:
- More efficient purchasing process.
- Cost savings by making it easier to identify and purchase from preferred vendors.
- Streamlined/faster approval process.
- More efficient and more accurate payment process.
- Integrates with Banner and assists with budget management.
- Easy re-ordering of items.
- Can review purchasing history, generate reports.
- Reduction in paper-use.
How will SmartBuy Plus affect the way I work?
- There will be a single location for online ordering from key vendors. No need to logon to the vendor’s website (WB Mason for example).
- A key goal is to eliminate paper purchase orders. All purchasing activity will be generated through Smart Buy Plus, and POs would be created electronically.
- Approvals will be done electronically, eliminating the need to circulate paper purchase orders for required signatures.
- Receiving will also be done electronically – no more paper purchase order receiving copies.
- Encumbrances will be posted to Banner allowing improved budget tracking.
- There will be online forms that will also get routed electronically for the appropriate approvals.
What are the types of vendor catalogs?
There will be two types of vendor catalogs available in SmartBuy Plus – hosted catalogs and “punch-out” catalogs. It is expected that there will be approximately 12 catalogs available when the the system is introduced.
- A hosted catalog resides within the eProcurement system and is maintained on a periodic basis by the vendors.
- A punch-out catalog is hosted on the vendor’s website. Shopping carts are then returned to Smart Buy Plus for processing.
- “Non-catalog” items can also be ordered through the system, whether or not the vendor is one of the catalog vendors.
How do I find out which vendors are available in SmartBuy Plus?
In order for a vendor to be available in SmartBuy Plus, two things need to occur. The first is that the vendor needs to be set up for payment in our accounting system (Banner). The second is that the vendor needs to be flagged as an “eprocurement vendor” in Banner.
When using SmartBuy Plus, you can check to see if the vendor is available by browsing the list of currently active vendors. You do this by clicking the “Vendors” link next to the word “Browse” located at the top of the screen:
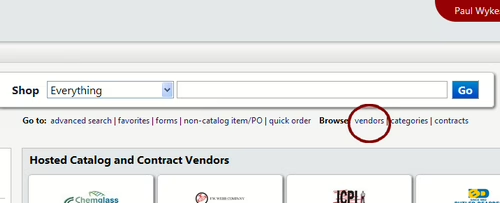
You will then see a list of vendors you can browse. You can also then search for a particular vendor by clicking on the + symbol to the left of “Click to expand Search for Vendor Filter” at the top left of the browse vendor page.
How do I request a new vendor to be added?
To request an existing vendor (already in Banner) be added to SmartBuy Plus, please send an email message to apayables@clarku.edu. Any additional ordering information (fax/email) you can provide is helpful.
For a vendor that is brand new to Clark, please complete the “New Vendor Request Form” located in the “Forms and Services” section on the home page of SmartBuy Plus. Please note that you will need to provide a completed “Substitute W9” form, which the vendor will need to complete and provide to you. A blank form is available for download. If the vendor is an individual with a social security number, please do not upload the W9 form into the New Vendor Form but instead fax it to 508-793-7500.
After you have completed the form, select “Add and go to Cart” from the “Available Actions” menu located at the top of the form and then click on the blue “Go” button. Even though you are not placing an order/making a purchase, you will still need to go through the checkout process (or assign your cart if you are a shopper). This means you also need to enter accounting codes since you cannot complete the checkout process without them. As accounting codes are not relevant to a new vendor request, you can just enter whatever accounting codes you would like – they will be ignored. You should then submit the requisition. The accounting office will let you know when the vendor set up is complete.
What do I do if I encounter an error while trying to add a form to my shopping cart?
When you try to add a completed form to a shopping cart, you may receive one of the error messages below:
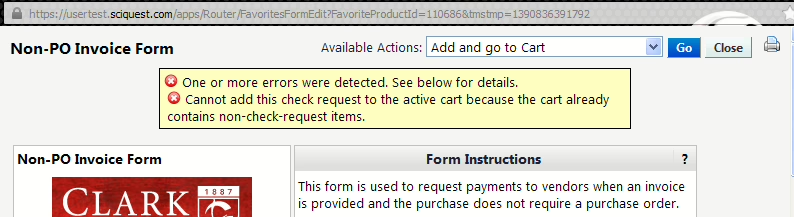
This error is caused because certain forms are processed differently in SmartBuy Plus and therefore can’t be mixed with other forms or orders. To resolve this problem, you are going to need to have an empty cart to save your form to. Please follow the steps below.
- The form you are working on should be in a separate web-browser window. The next steps require you to access SmartBuy Plus so you should either click on the browser window that doesn’t contain the SmartBuy Plus form or log into SmartBuy Plus using a different browser (Firefox or Internet Explorer) than the one that contains the form.
- View your active shopping cart by clicking on the shopping cart icon at the upper right hand side of the screen and then by clicking “View My Cart”.
- You will now be in “Shopping Cart” view and you can see the item(s) that are currently in your cart.
- You have two options at this point – you can empty the cart or you can save the cart and create a new one.
- You can delete the items in your cart by clicking on the “Empty Cart” button in “Shopping Cart” view (button is located in the upper right of the screen, below and to the left of “Proceed to Checkout”). Once you have emptied your cart, proceed to the last step below.
- You can save your cart and create a new one. Under “Shopping Cart” at the top left of the screen, there is text that reads “Name this cart.” In the box next to that text, give the cart a name that is meaningful and click the “Update” button just below the text. You should then create a new cart buy clicking on the shopping cart icon under the home icon located on the menu bar at the left of your screen. Then select “My Carts and Orders” and then “View Draft Shopping Carts.” This will display a list of any saved shopping carts you have (and this is how you can return to your saved cart). Click on the “Create Cart” button at the top of the screen, which will provide you with a new shopping cart.
- At this point you have an empty shopping cart to work with. Click on the browser window that contains the form you were working with. At the top of the form, click “Save and add to cart.” Proceed to checkout (or assign your cart) as you normally would.
How do I set up a dashboard?
SmartBuy Plus dashboards features provides an alternative “home” screen which allows you to quickly see and access important SmartBuy Plus information. There are currently two dashboard formats for you to choose from. Instructions for accessing and setting dashboards is shown below. The use of dashboards is strictly voluntary and a personal preference.
To use a dashboard:
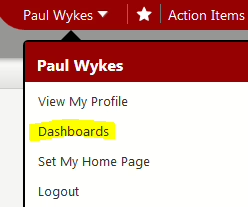
- Click on your name, towards the upper right of the screen. You will see the menu shown below. Click on “Dashboards.”
- You will now see a dashboard called “Shopper Dashboard”. You can scroll down the screen to see the rest of it. You can also choose to look at an alternate dashboard by selecting “View Another Dashboard” and selecting from the dropdown list.

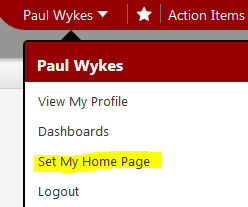
- Once you have decided which dashboard you’d like to use as your home page, click on your name again and this time select “Set My Home Page” from the menu.
- If you decide you want to set your home page back to the default home page (no dashboard), select “Shop”->”Shopping Home” from the menu on the left of the screen and then select “Set My Home Page” per the instructions above.
Who do I contact if I have any questions regarding SmartBuy Plus?
Please email any questions to smartbuyplus@clarku.edu

Purchasing Office
Contact information
1-508-421-3839
Office location
Monday – Friday
9:00 a.m. to 5 p.m.